

Content & Photos: Sarah Caffey PT, DPT, CMTPT, CYT
Edited by: Angela Prescott PT, DPT, CMTPT, CMPT, CSCS
When your muscles don’t “work well with others:”
When describing muscles, I put them in two categories:
Prime Movers: These muscles work to move the joints in your body. They are typically the bigger muscles of your body, the ones that help you perform everyday motions.
Stabilizers: These muscles engage to support the joints prior to action. When you move, the stabilizing muscles should fire just before the prime movers engage to change the joint angle. (Literally microseconds before..)
When it comes to the lower back, the inner core (which includes the transverse abdominis, multifidus, and pelvic floor muscles) stabilizes the lumbar spine and pelvis during movement. If the inner core is not strong enough for the activity at hand, it cannot effectively stabilize. This leads to adjacent muscle hypertonicity (muscle tightness) and compensation - both in your posture and your body’s mechanics. What’s really interesting is that multiple studies have shown that when lower back pain is present, the deep core muscles actually shut off! So, basically, your body gives up on stabilizing the back when the back hurts (yup, serious design flaw). So, that if you’ve got lower back pain, you’ve also got muscular problems to address!
When this disengagement of the core occurs, the prime movers begin to take on the role as stabilizers in addition to their role as a prime mover. This means that the long muscles of the spine (the paraspinals) begin to tighten in an effort to restrict motion at each vertebrae. The problem is that they run from your head to your “tail” so they aren’t specific in their ability to stabilize one vertebrae. The more they try, the more they fail. When they fall short, your brain tells them to then tighten further hoping that they’ll eventually be able to lock things down. They can’t based on their length - and so the cycle continues. This reflexive tightening is sympathetic in nature, meaning “fight or flight” with the goal being short-term stability for emergency motion. Basically your body is trying to maintain your mobility in THIS moment with no concern for the longterm repercussions…
Thus, as time goes on, this tightness causes increasing weakness, both in the stabilizers (deep core) and the prime movers (lumbar paraspinals). Weakness then leads to more tightness. It’s a tough cycle to break on your own, and even with good rehabilitation, it can be a long road to retrace.
Enter the Psoas….
In the case of lower back pain, when the inner core is inefficient (weak or inhibited) for the load of the activity at hand, the body compensates with the paraspinals. When they prove “less than helpful,” it calls on the psoas, a hip flexor, to try and lock down the spine. Now, like an overworked employee, the psoas is pulling triple-duty when this happens - stabilizing the spine, flexing the hips and anchoring the pelvis with your movements. As it fatigues, it loses extensibility and becomes more tight. Add to that lots of sitting (yup, 2020-style) which holds it in a flexed position at the hip, and you’re beginning to see some serious dysfunction in this muscle.
The psoas attaches to the front side of all five lumbar spines and crosses the hip joint, with one psoas for each side of the body (one on the left & one on the right). If one side gets tight, it can pull on laterally on the lumbar spine. This causes increased arching of one side of the spine in the low back and a slight side bend. This continuously held increased arch, or extension, of the spine can be the culprit of multiple dysfunctions. including:
The worsening of the continued cycle of inner core inhibition described above
Abnormal forces on our discs between the lumbar spine
Less space for our nerves to travel from our spine to their destination causing a ‘pinched nerve.”
Loss of motion in the spine & a secondary loss of joint circulation.
The problems continue down from the back and into the hips. When the psoas becomes tight, it prevents our hip/legs from extending behind us. This extension of the hip is a motion necessary for a symmetrical walking pattern, as well as, engagement of the gluteal muscles that support the hip joint. These restrictions could lead to other injuries of the lower extremities down the road (knee problems, ankle pain & foot issues). All this will inevitably occur because the body will find ways to compensate until it can’t anymore, leading to different patterns of tightness and restrictions.
Ok, now I’m thoroughly overwhelmed and mildly depressed by this information. What can I do? Please…help…
Some good news: Once you recognize that some of these compensations are present within your own body you can be proactive! I’ve outlined some ways to help keep your hips open and your core mobile with some simple yoga inspired stretches! These exercises work on releasing the psoas & turning the lower core “back on.”
Note: PLEASE Remember to listen to your body and not to push yourself into any position that doesn’t feel right! And, when in doubt, consult a professional prior to trying any home program or self-diagnostics!
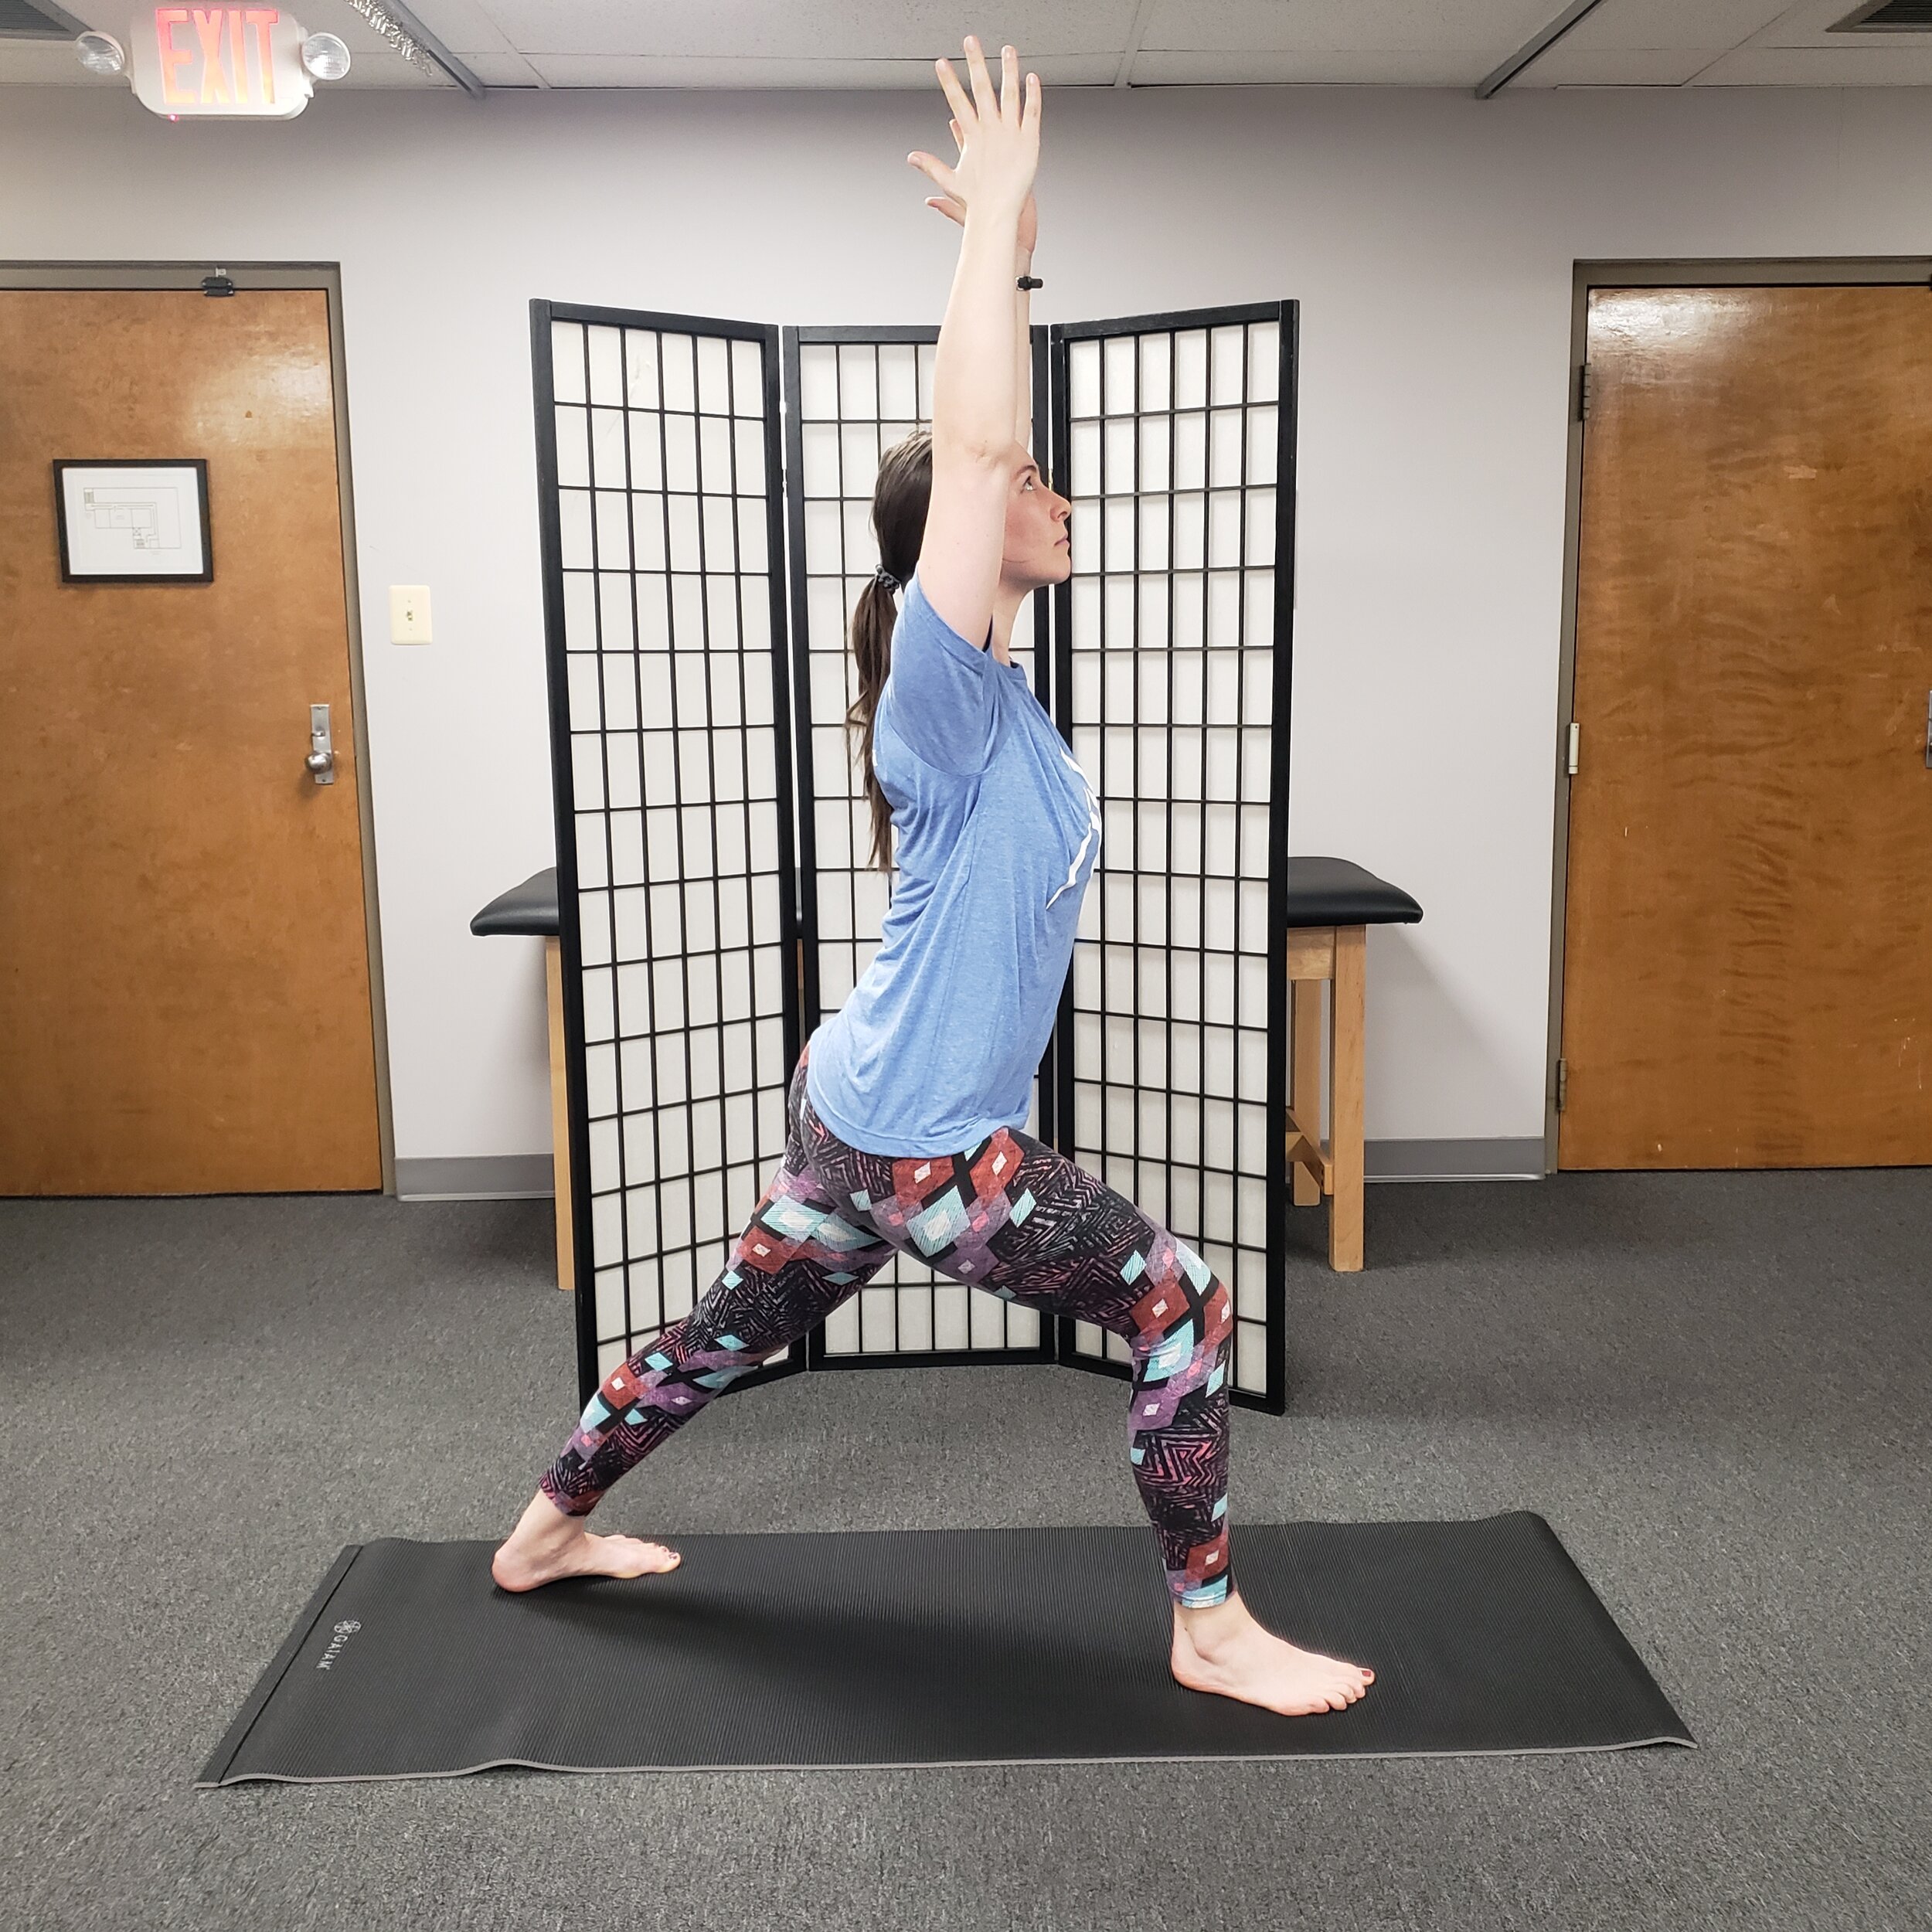
Warrior 1
Warrior I
Begin standing at the front of the mat with feet hip width apart. Step right leg back (about 3-4 feet) so you are on the ball of your back foot with your front knee bent. Let your back heel spiral in towards the ground so the entire foot is flat with toes pointing toward front right corner of mat. Plant firmly into feet, keeping entire bottom of back foot flat to ground by first pressing into back heel and using this engagement to help plant outer edge of foot. Arms rise over head.
Draw left hip back (hip of leg that is forward) to ensure pelvis is square to front of mat (many times the pelvis opens up to the side in a lunge position.)
Press pubic bone forward’ or ‘find length in tail bone’ (tail bone reaching to ground) both descriptions cueing same action to engage inner core and prevent arching of low back.
Shoulder blades relax down the back and away from ears.
(Try not to worry too much about if you are doing it right or wrong, but rather how it feels in your body, adjust accordingly)
Hold for 45-60 seconds & be sure to do BOTH sides!
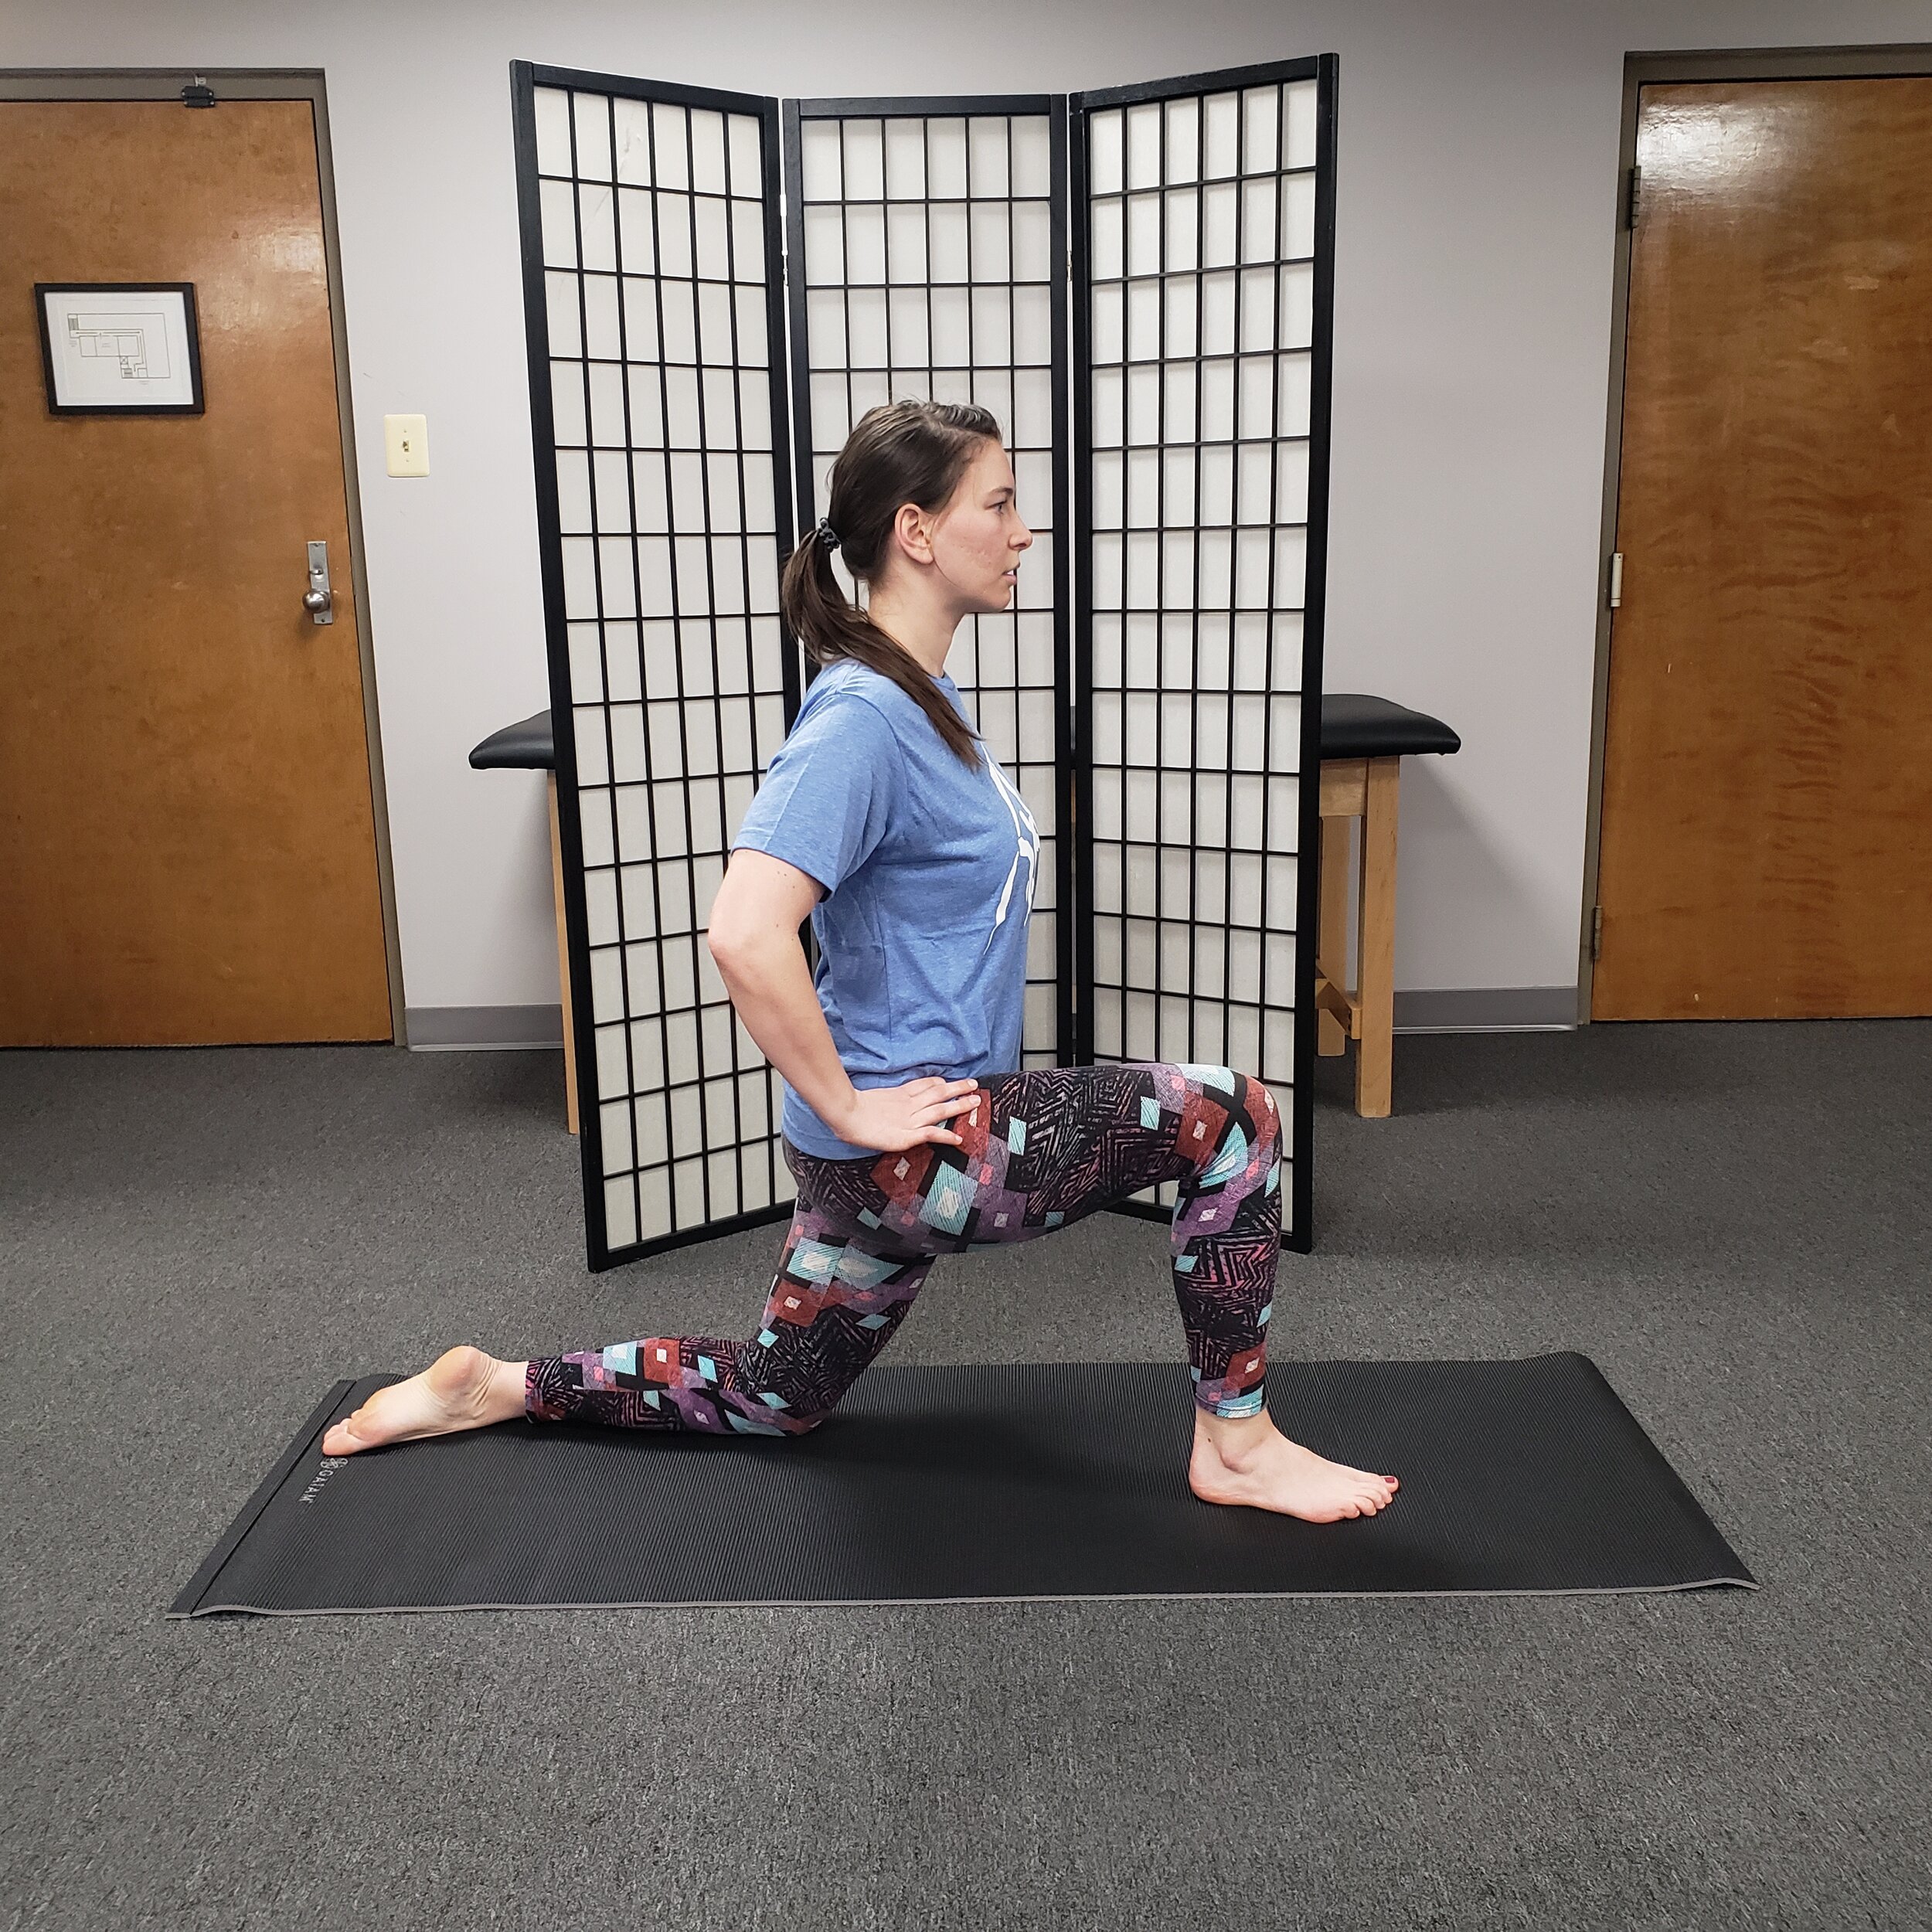
Kneeling Hip Flexor Stretch
Kneeling lunge (cued for psoas release)
To get into kneeling lunge position: start from table top position (shoulders over hands and hips over knees), on exhale bend right knee towards chest and place foot between hands. On inhale, plant into front foot as torso rises.
Try to keep pelvis square to front of mat (we tend to open our hips out to the side in a lunge) and draw the front leg back.
Have hands come to hips, let fingers feel for the front hip points/bony prominences. As if these hip points are your headlights shining forward. If you lean forward into your lunge you might notice a point where these lights start shining down or turning - don’t let them! During this exercise try to keep them facing forward. Bonus - you may notice the lower core engaging to help with this!
While in this kneeling lunge position, try to maintain shoulders over knees as you press hips forward, keep hip points facing forward. A deep stretch in the hip of the leg that is back may be sensed - it can refer into the front of the down thigh. Hold this position for 45-90 seconds, breathing into your belly.
While maintaining stretch try subtly pressing hips side to side, notice this new sensation
To come out of position: Bring hips out of stretch. Place hands on ground framing front foot. Curl back toe under and lift knee, place right foot to meet the left. Knees come to the ground returning to table top position.
Be sure to do BOTH sides!
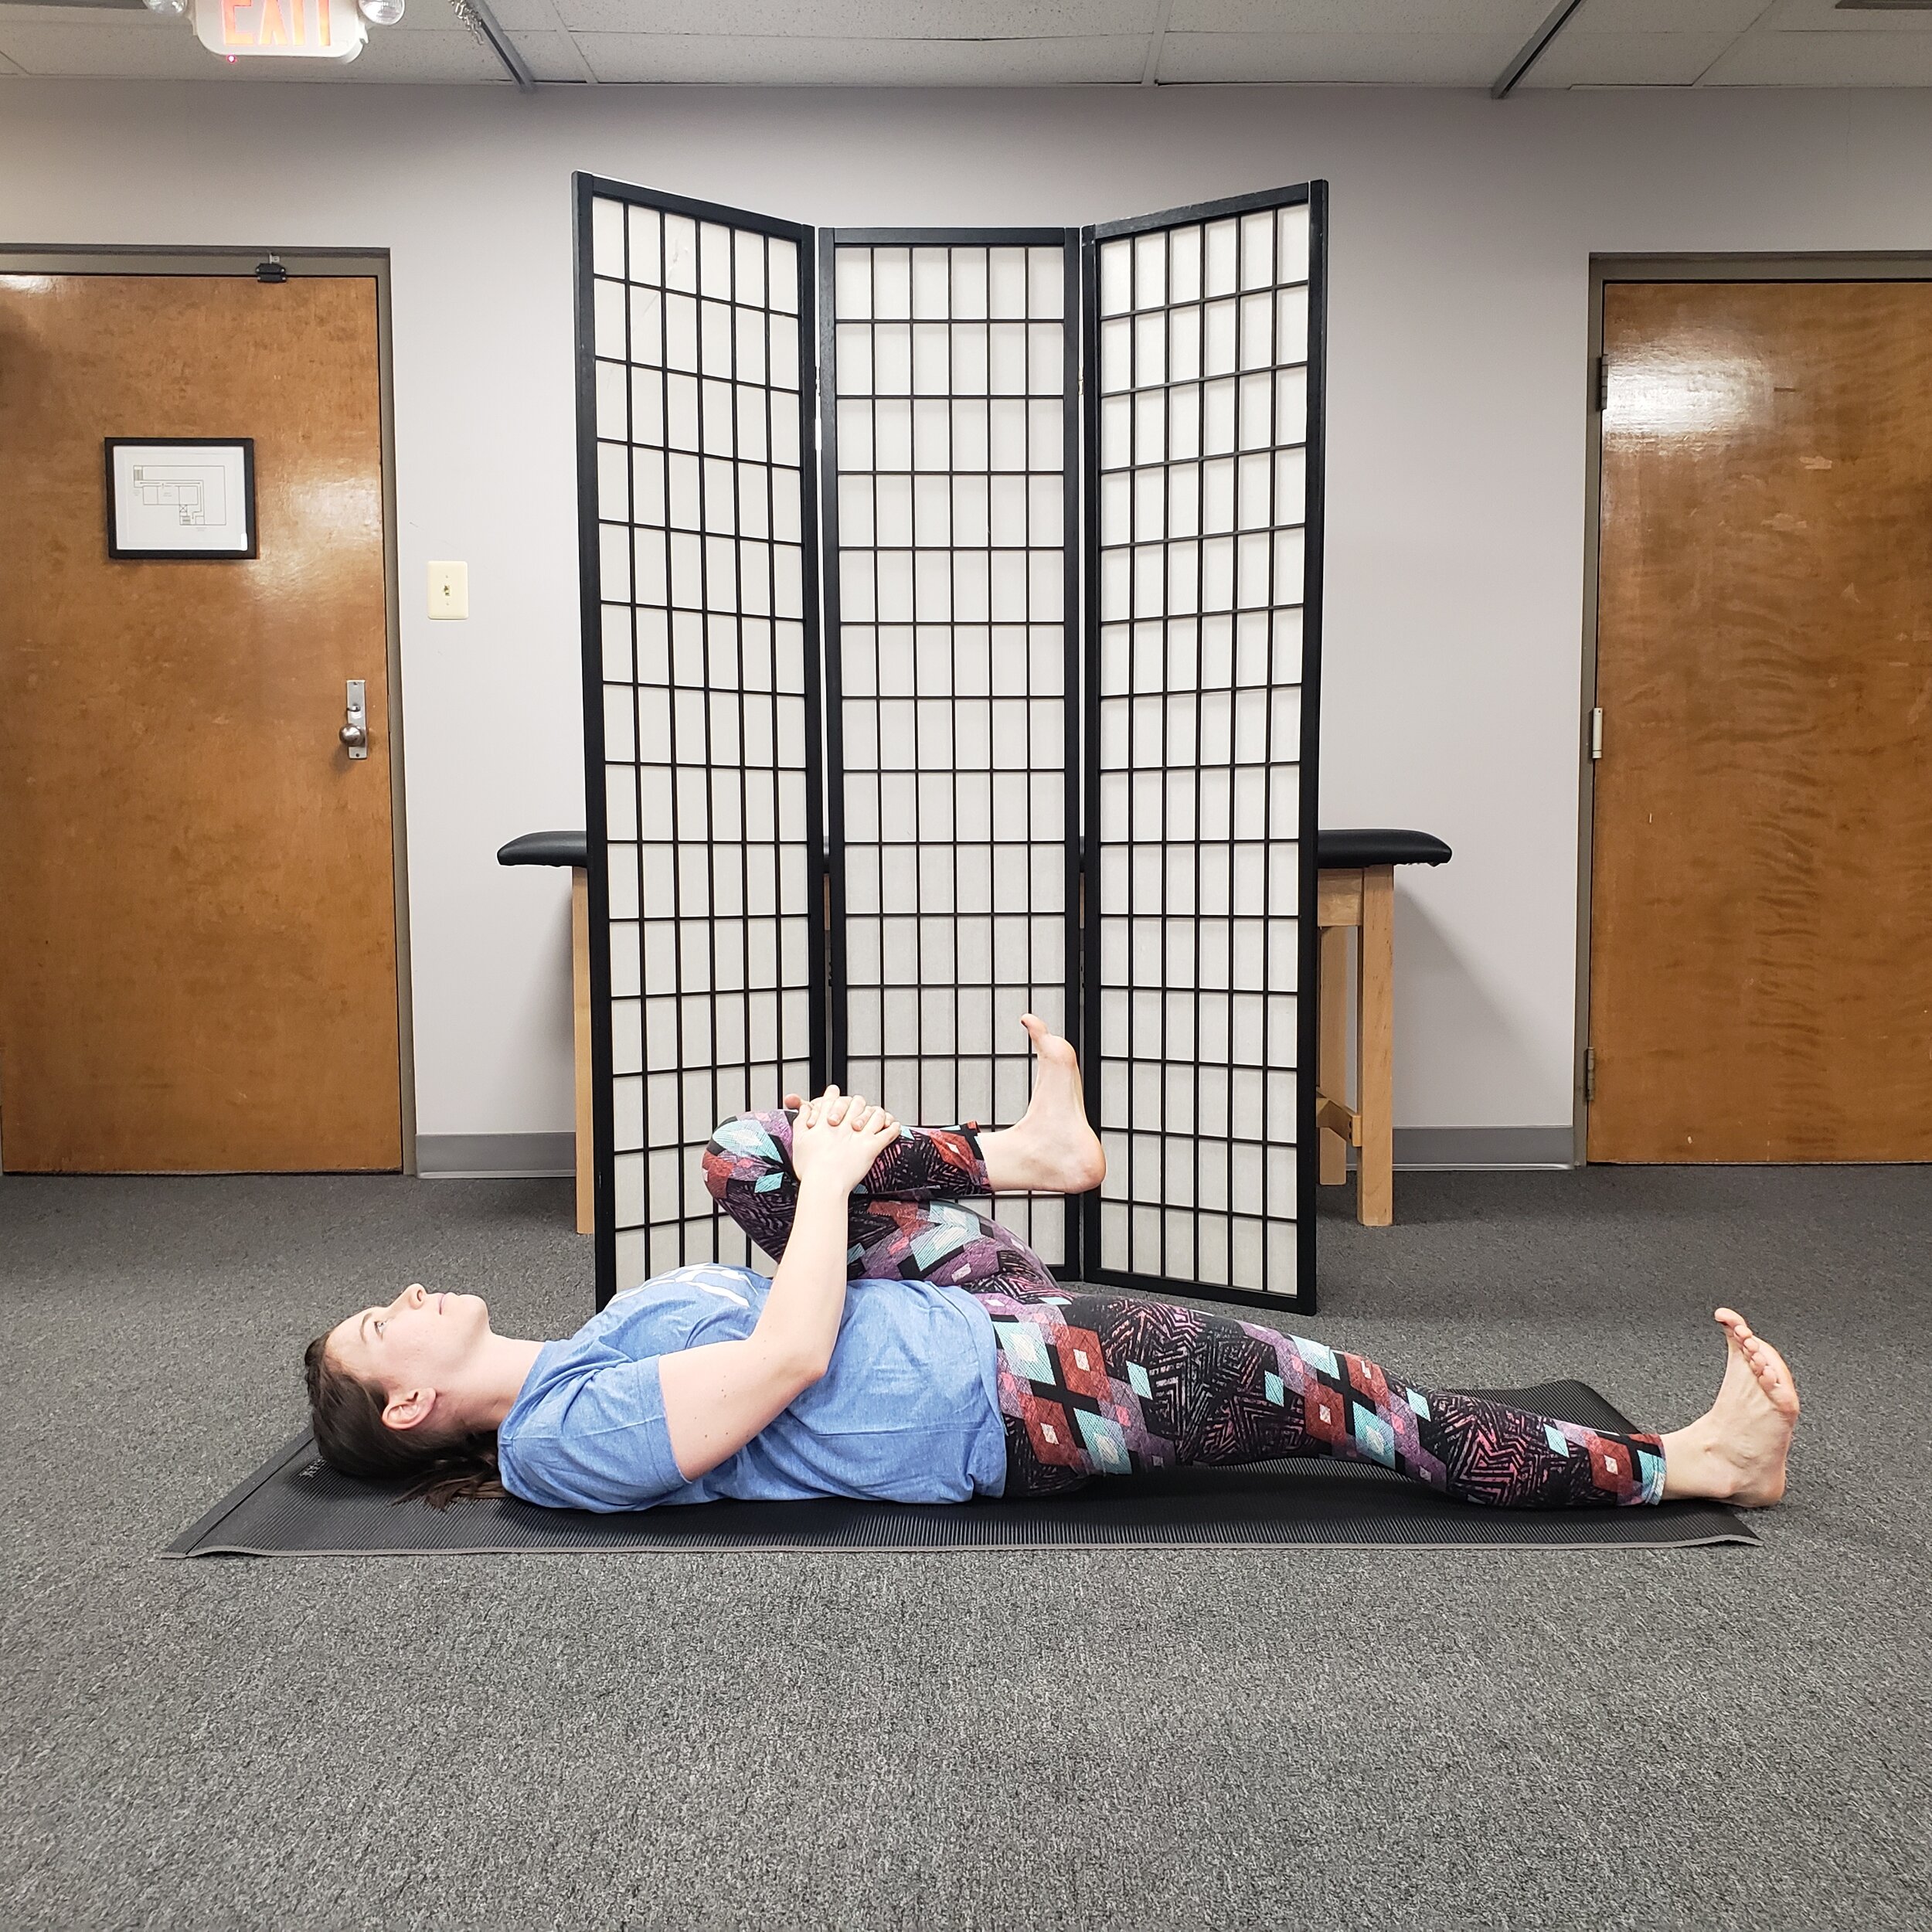
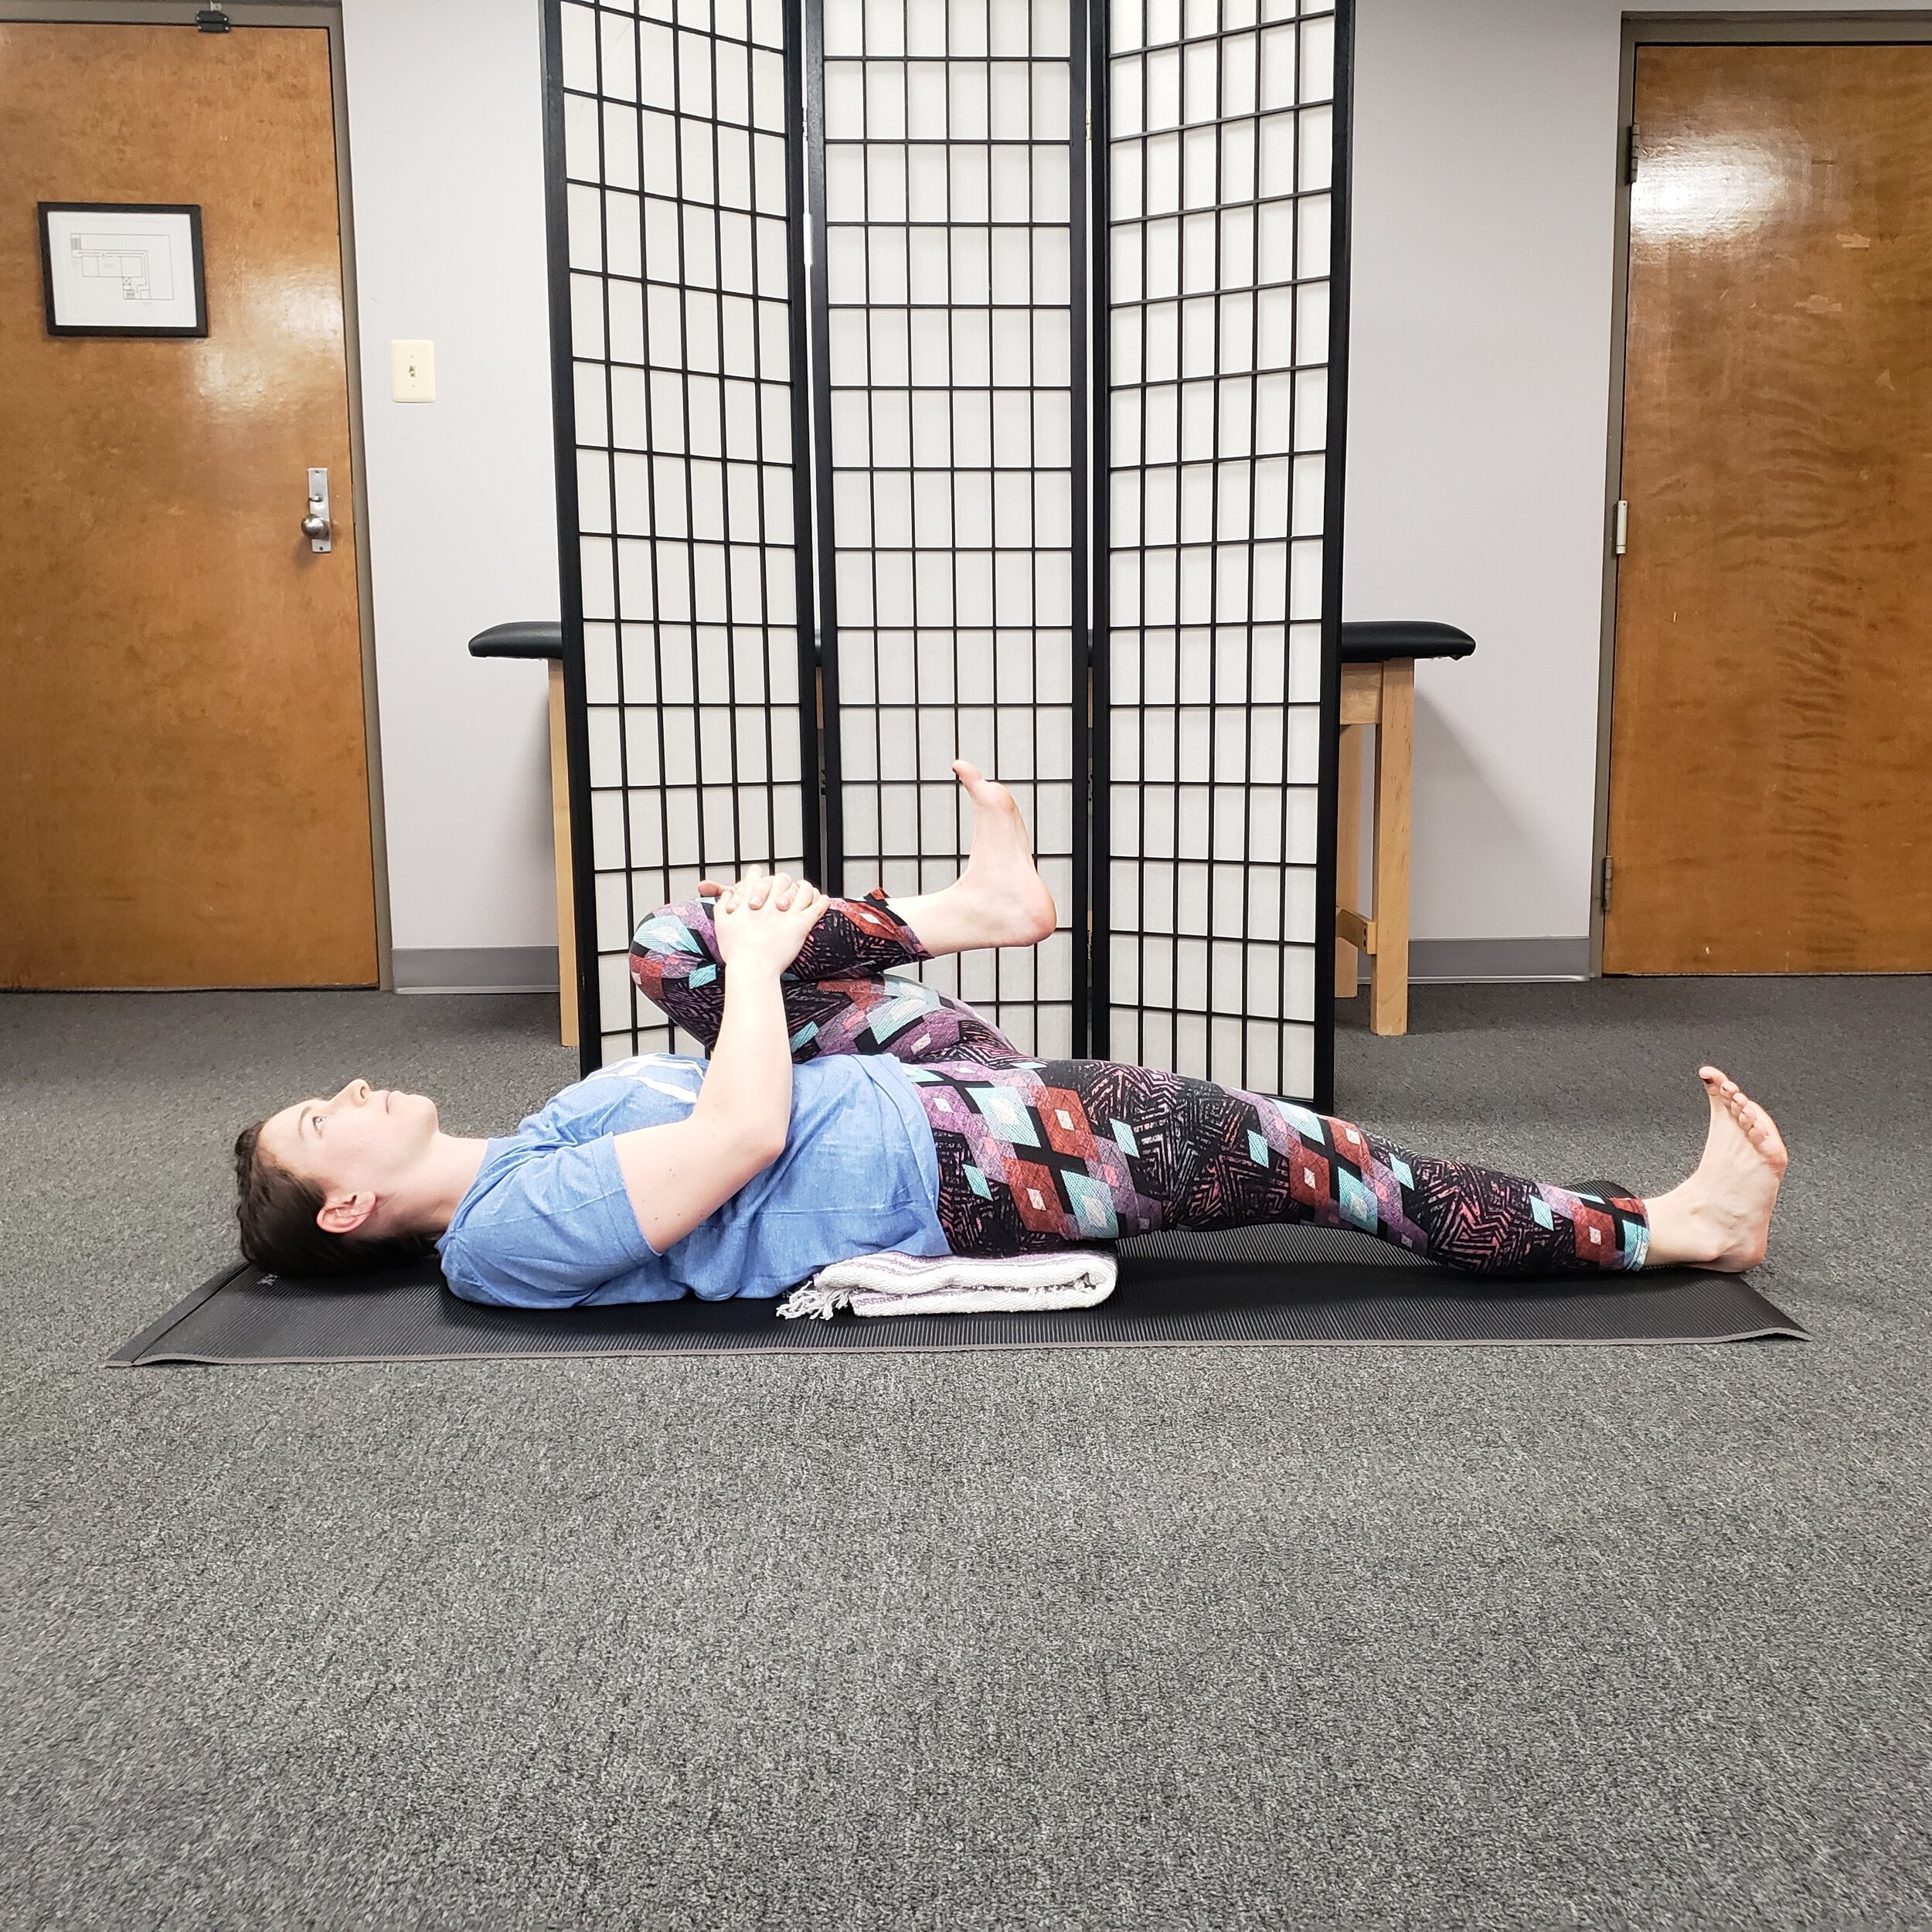
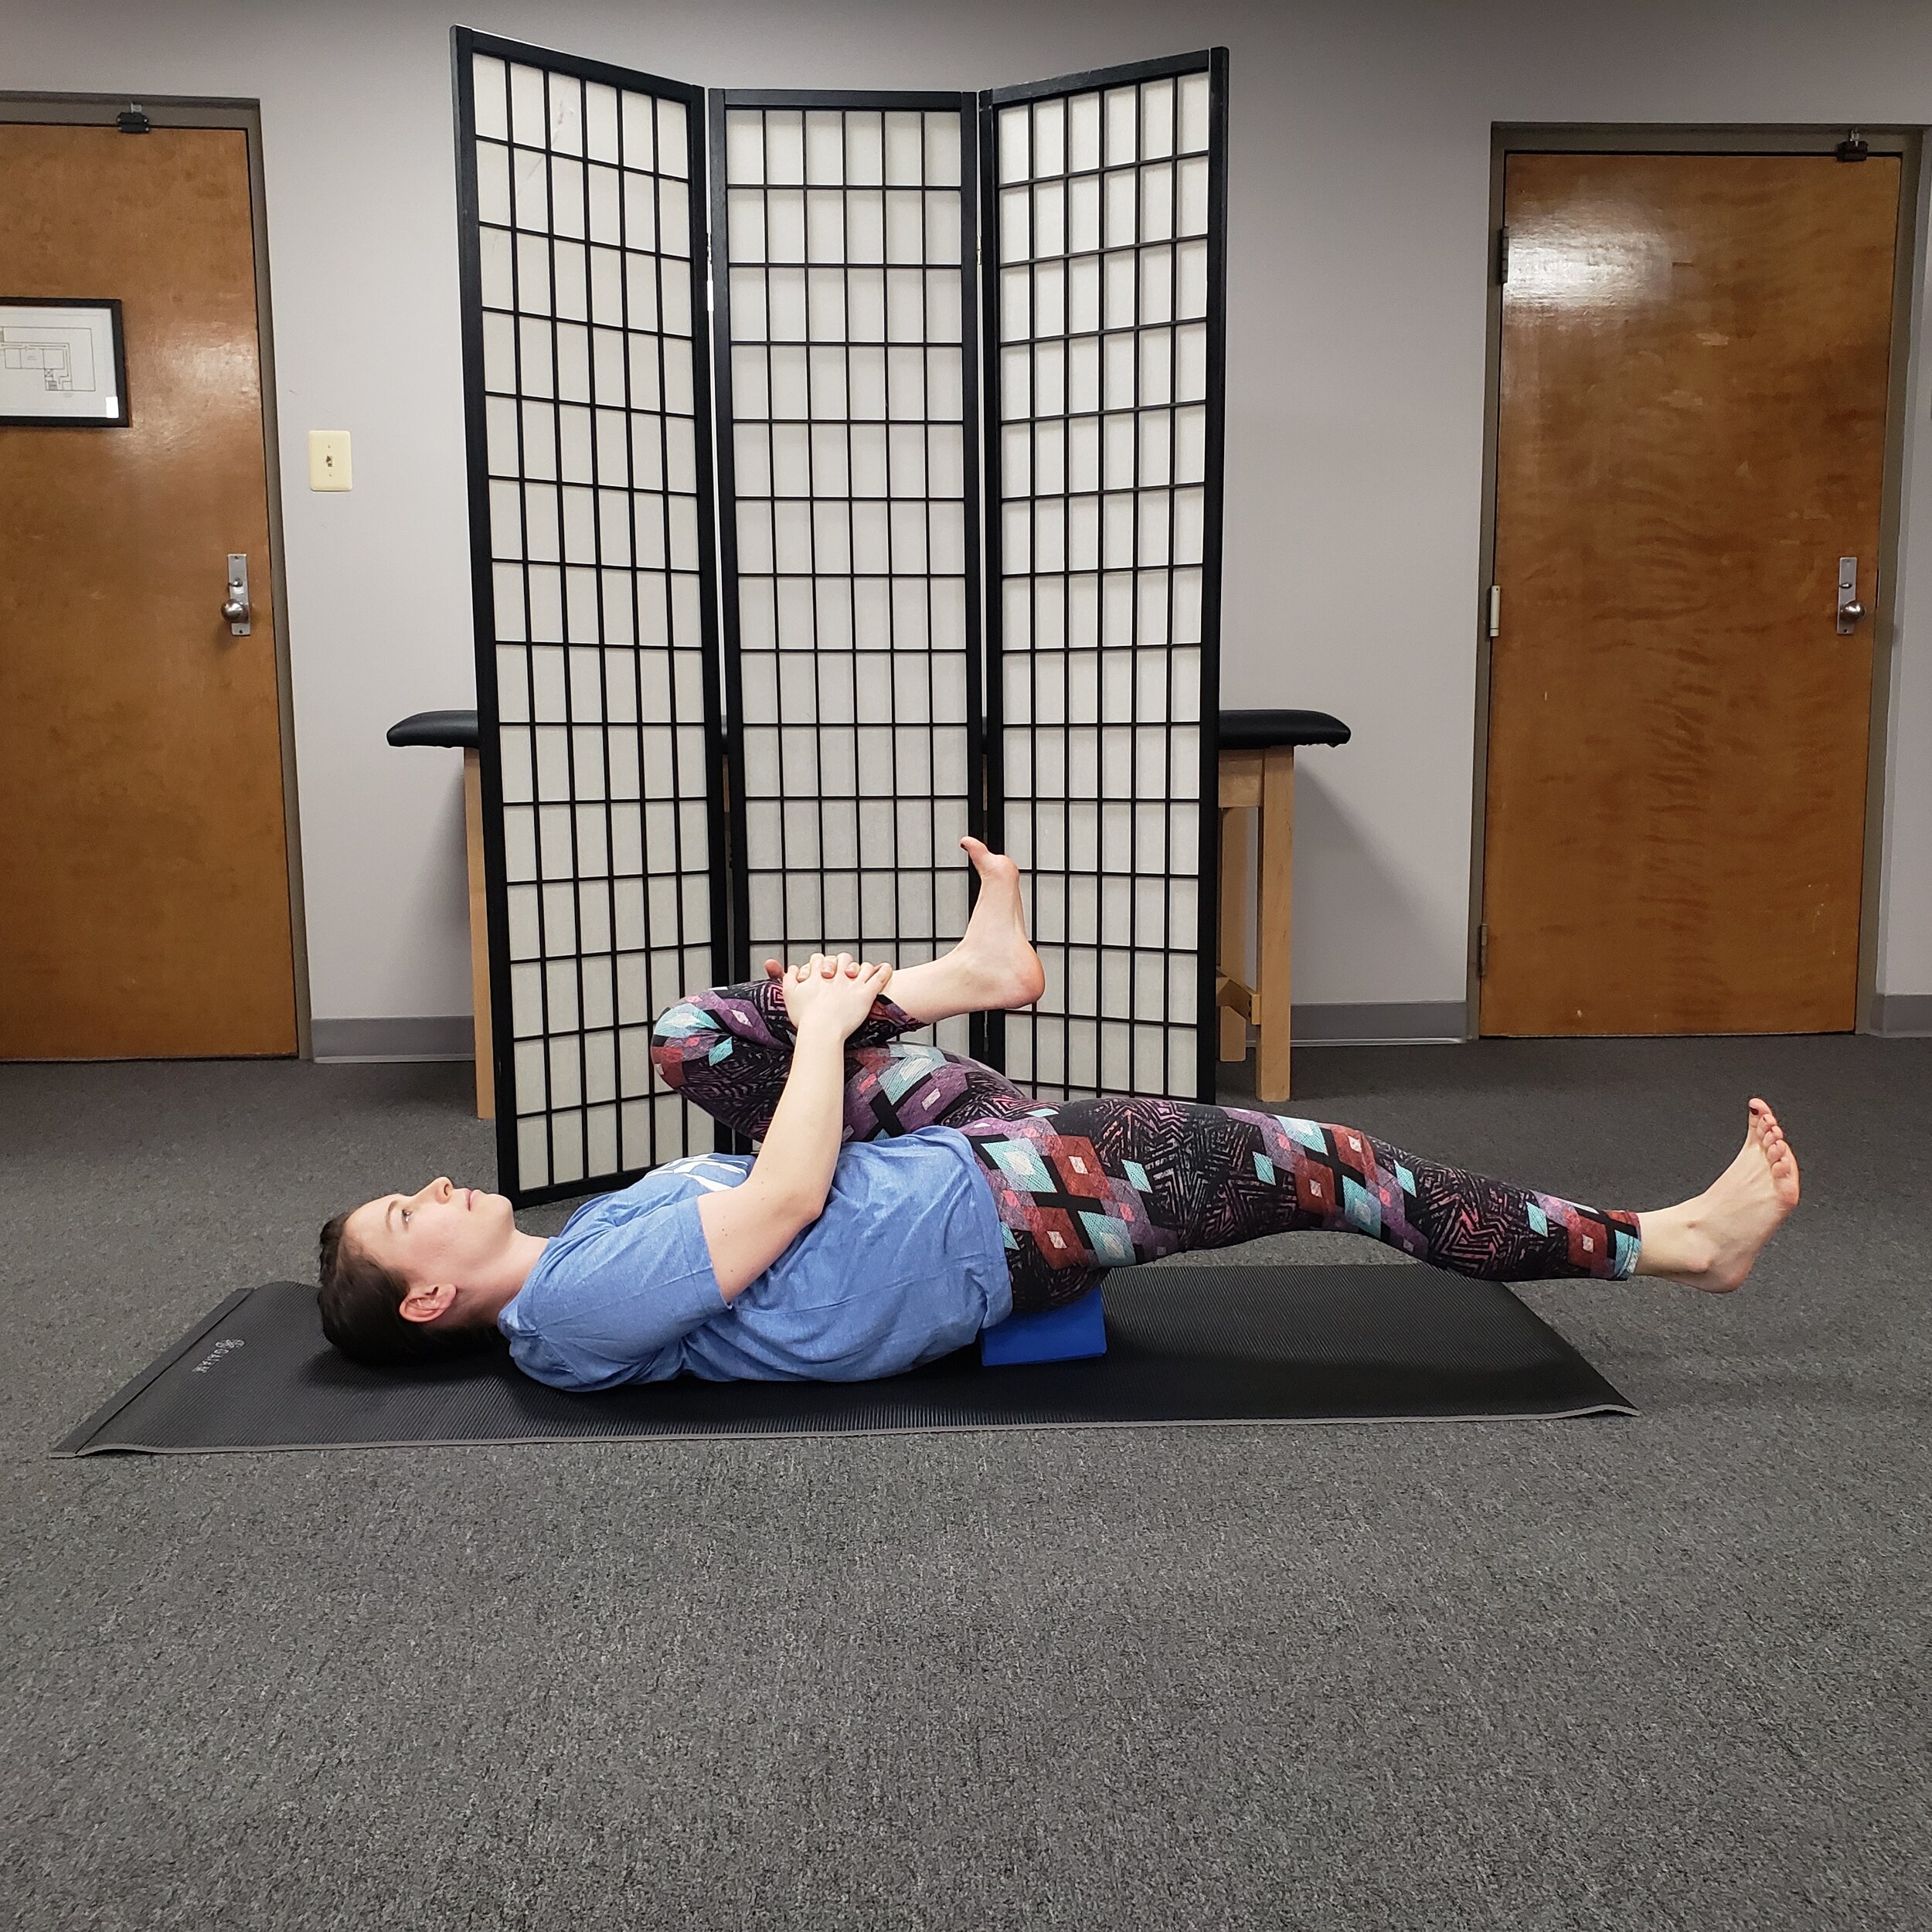
Single Knee to Chest
Knee to chest
While on your back, hug right knee towards chest. Legs stay engaged with toes pointing to sky and left knee pressing to ground. Breathe into belly, exhale hugging deeper into stretch. Make sure shoulder blades are drawn back and away from ears.
For further stretch, use folded towel or yoga block and place under hips/sacrum. For placement, think just below the ‘dimples’ of your lower back. You should feel a rounding in your lower back with this positioning, if you sense arching in your back bring block/towel lower. Hug knee to chest, following cues from above. (See two images below)
Hold for 60-90 seconds & be sure to do BOTH sides!
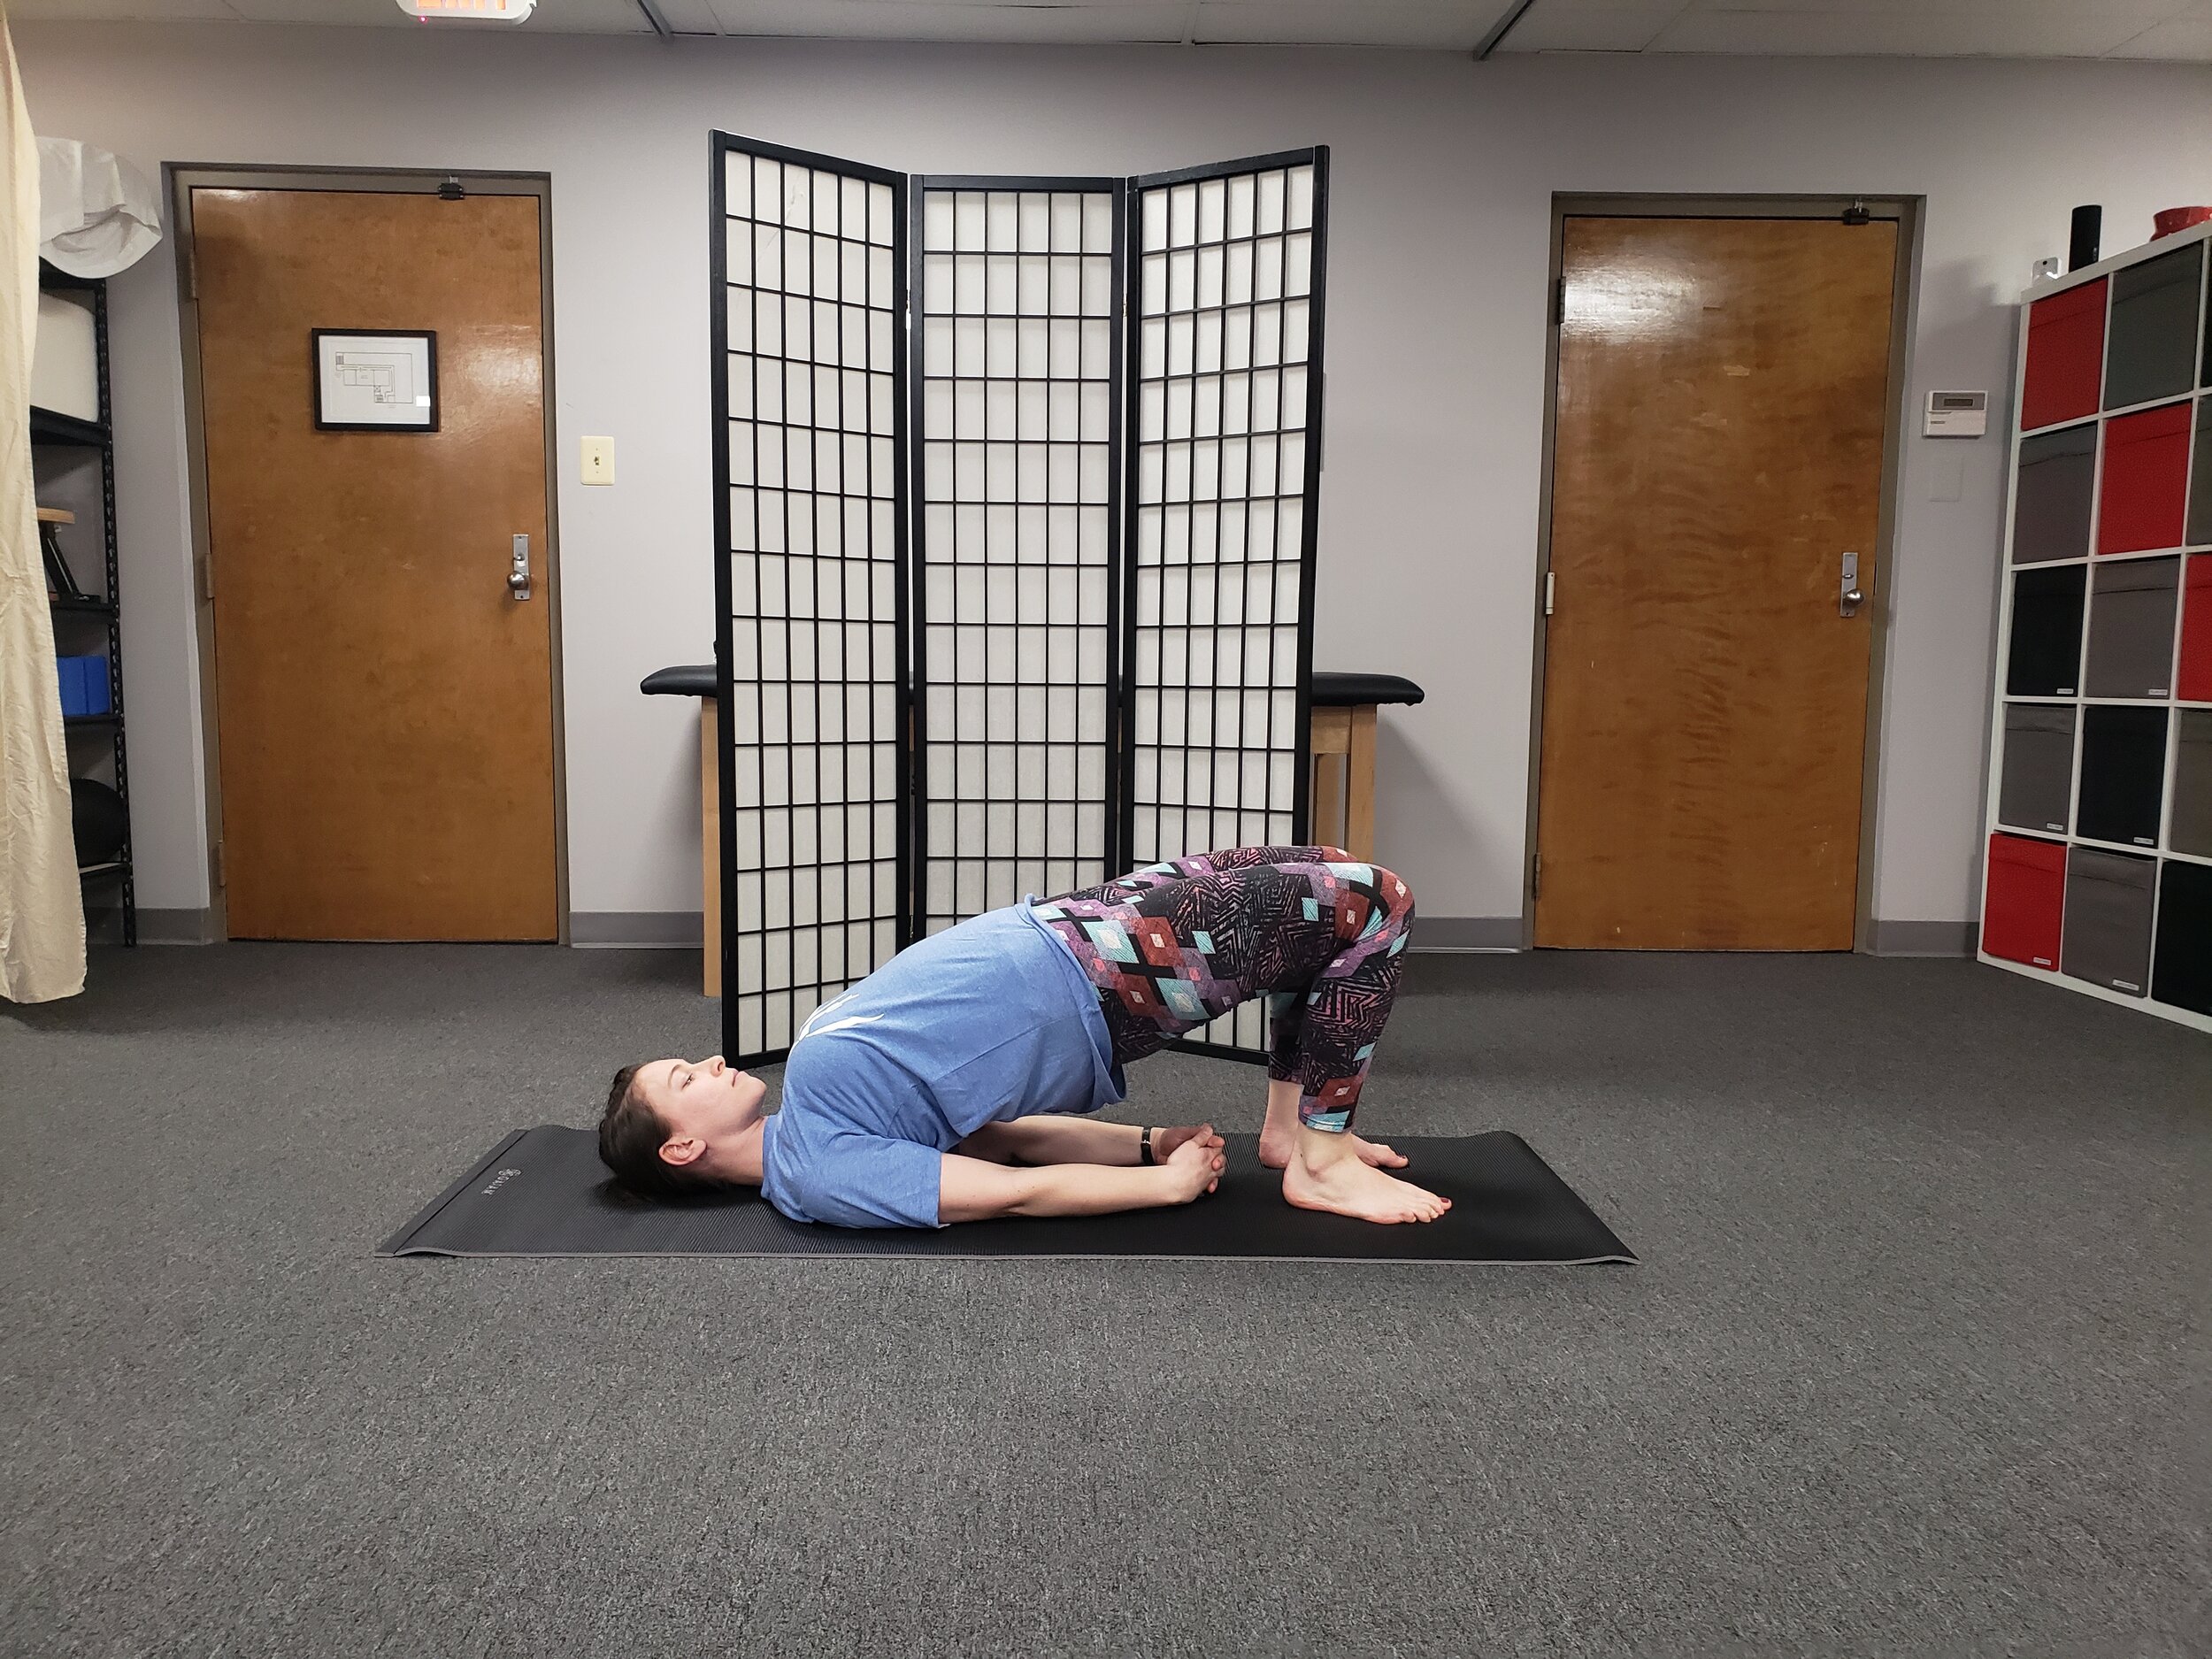
Bridge
Bridge
While on your back, knees bent as much as able, feet hip width apart, arms to your side.
Lift your hips off of ground, by first peeling your tail bone off of ground. Then move up one to the next spinal segment & then the next one, & so on.
As weight comes into your shoulders begin to press your shoulder blades into ground as you reach hands towards feet.
You can stay in this version of bridge if it feels best in your body, or you can roll the shoulders under the body, allowing you to interlace your fingers together behind your back. Continue to press the back of your shoulders into the ground helping to lift the chest on your inhale, while on your exhale lift the hips higher by squeezing the gluteals.
Eyes gaze towards the navel. Jaw and neck relaxed.
Hold for 15-30 seconds. Feel free to repeat 1-5 times.
To come out of position; Release fingers, letting hands and arms separate, slowly bringing your spine back down one vertebra at a time.
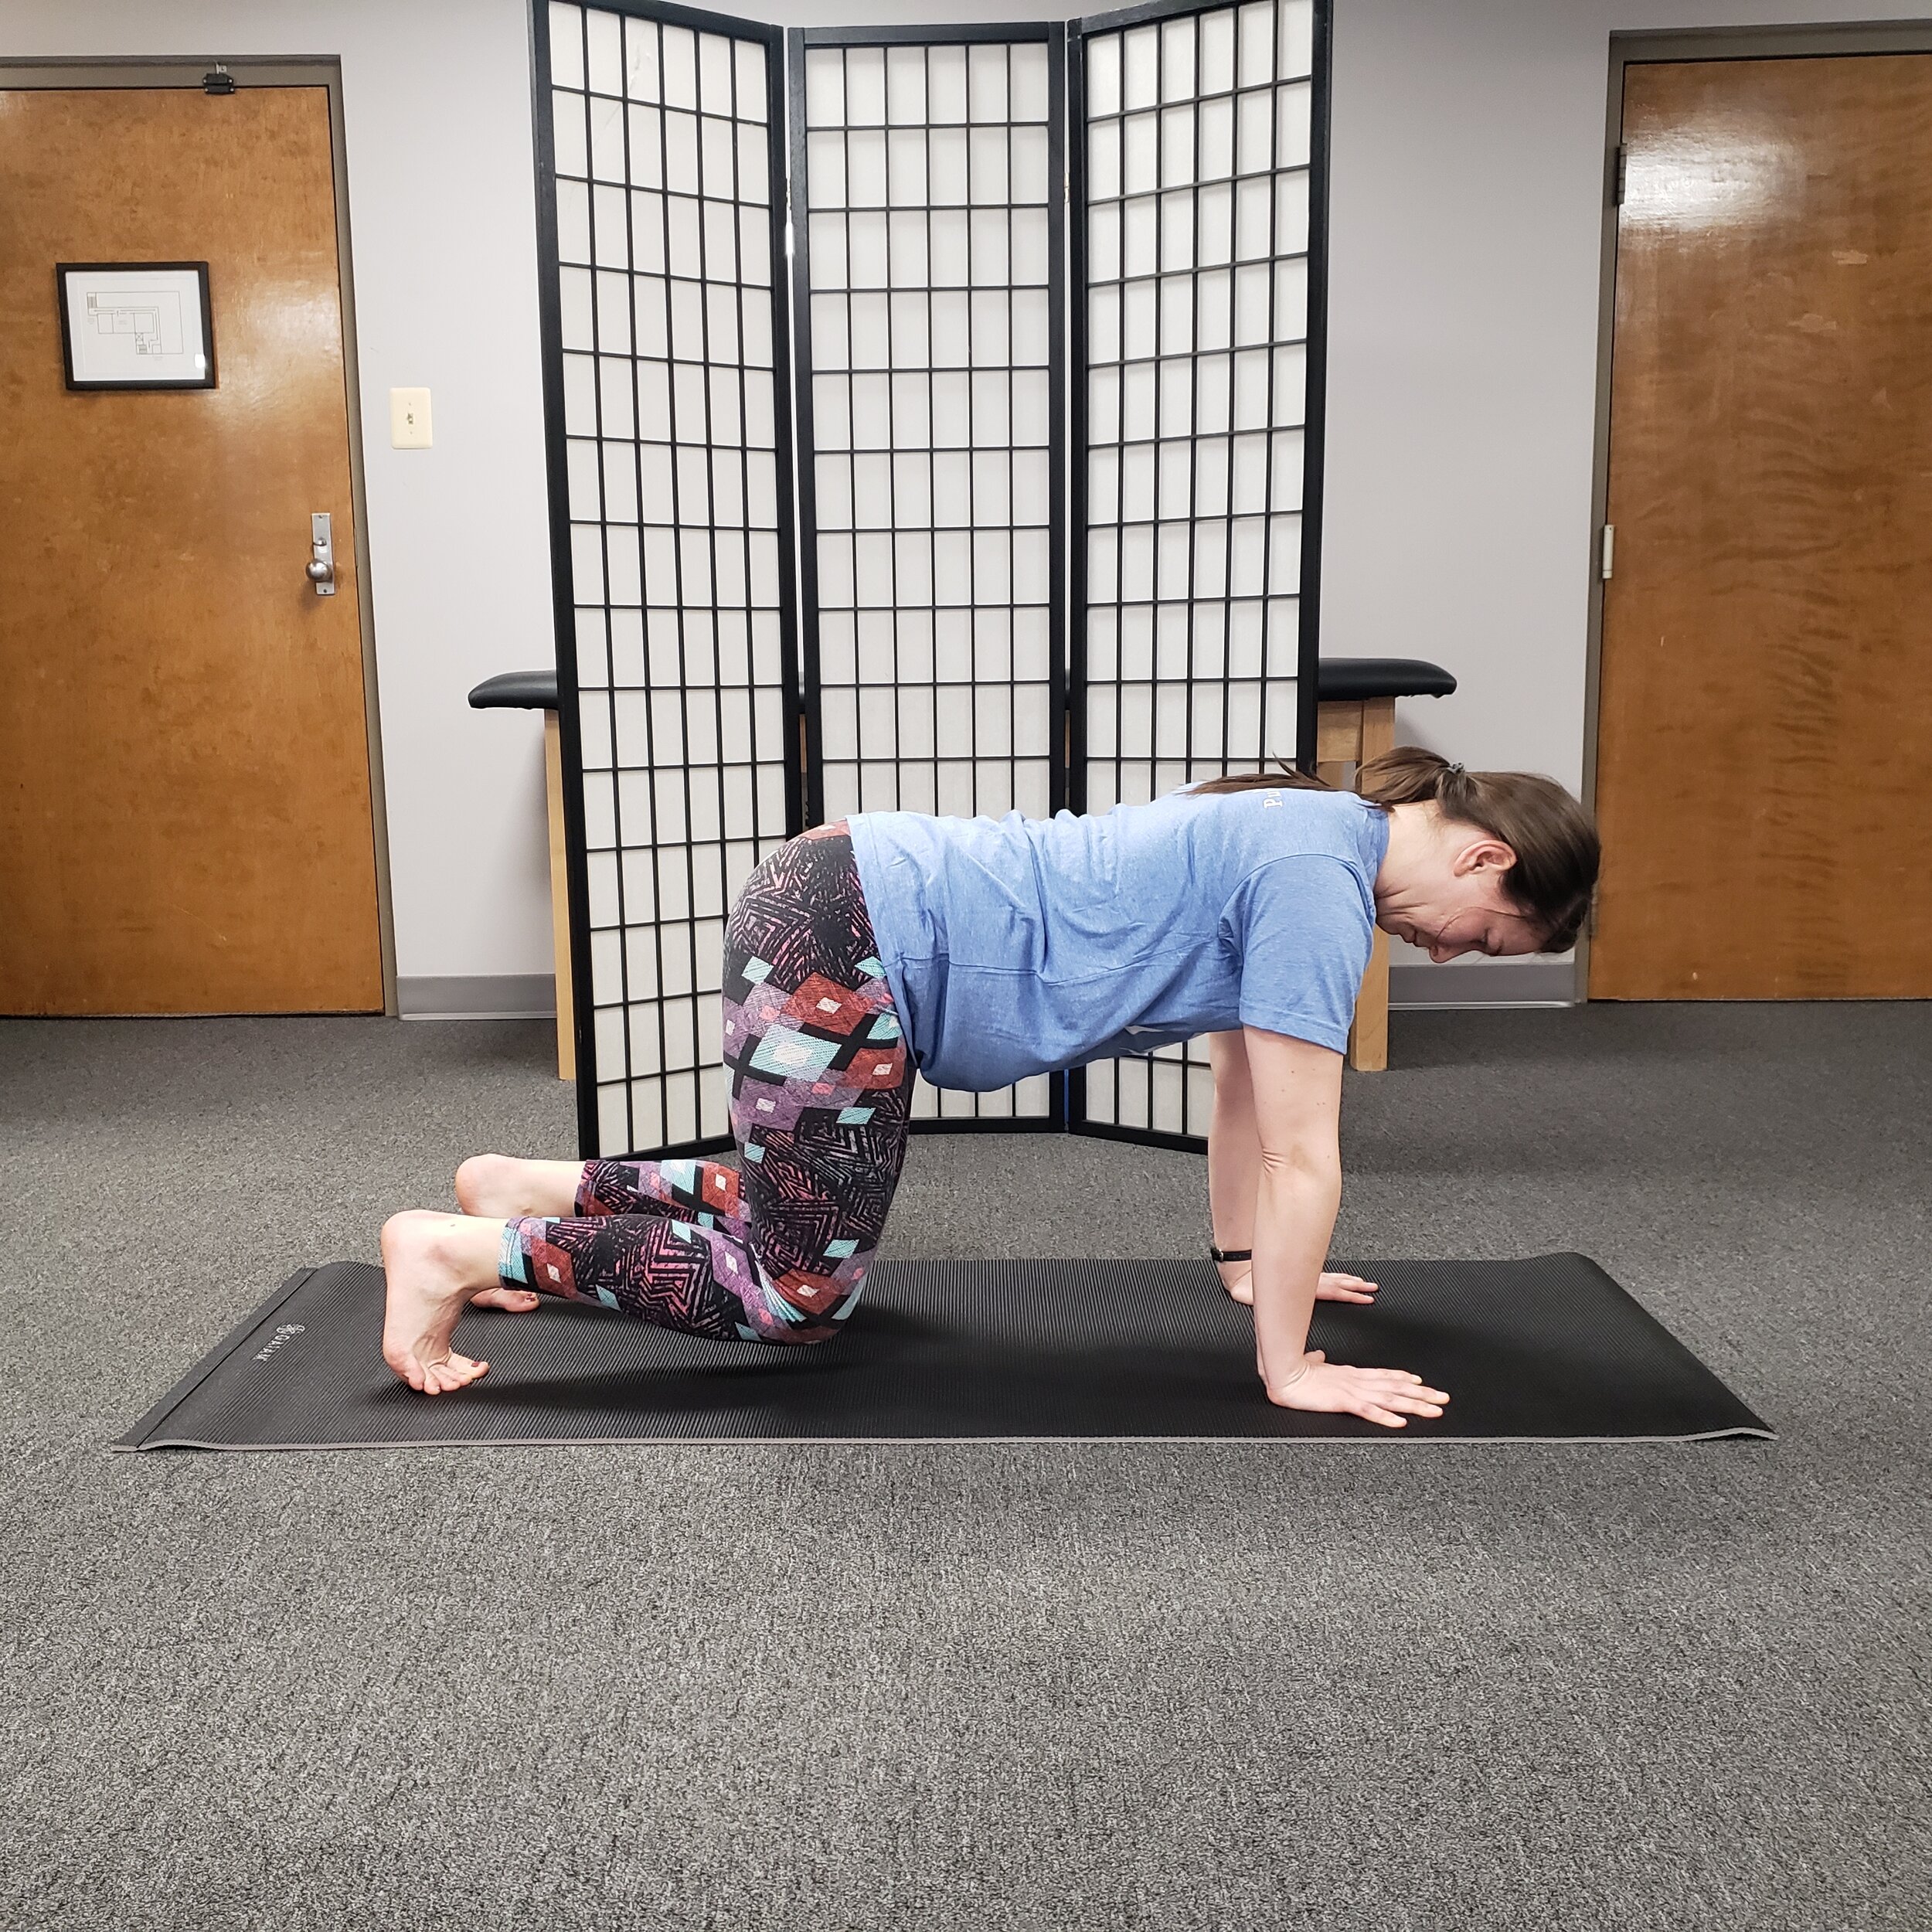
Table Top Knee Lift
Table Top Knee Lift:
While in tabletop position, shoulders overs hands and hips over knees.
Engage the stabilizing muscles of the shoulders
Draw shoulder blades away from ears.
Find slight external rotation of arms (without moving the hands), think rotating triceps towards armpits and biceps toward front of mat.
Keep the lower back flat (avoiding increased arch of lower back), think drawing navel in away from ground and towards spine.
Curl toes under.
While maintaining engagement of shoulders, lift knees 1-2 inches off of ground, lower core should be lighting up.
Hold for 3-5 breaths.
Lower, rest & repeat.
The goal is 10-15 slow & controlled repetitions.